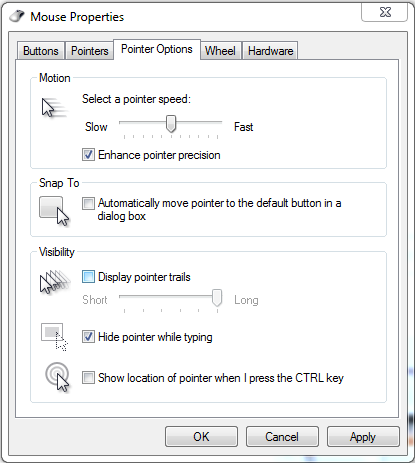
 Computers are designed to save people significant time when it comes to getting work done, and with a few simple tweaks and adjustments, you can trim even more seconds off a project, which really adds up in terms of gaining productivity. Your PC’s Snap To mouse feature is a classic example of this.
When enabled, Snap To automatically moves your mouse pointer to the dialogue box that pops up. This is the box that typically appears after you delete a file, close a window, or perform any other similar task.
Although, when using Snap To, be careful about what you click on. For example, your pointer may automatically move to the “Ok button” for something that you don’t want to approve; something like, “Are you sure you want to permanently delete this file?” A blunder like this can be avoided if you simply take a moment to read what you click on, instead of rushing yourself and clicking the first thing that pops up.
To enable this feature, go to Control Panel > Mouse Properties. Next, click on the Pointer Options tab and then checkmark the Snap To box that says “Automatically move pointer to the default button in a dialog box.”

Click OK or Apply when you’re done.
Be warned, this Snap To feature might take a little while to get used to (it’s always surprising to have your mouse pointer move when you’re not expecting it to). Also, in the event that you don’t want to go through these steps and enable Snap To, most dialogue boxes allow you to select the OK button by hitting the Enter key.
At the end of the day, it might seem like this is a rather silly tip because you’re just saving yourself few seconds of not having to move the pointer. However, any worker concerned about productivity understands the importance of saving a few seconds here and there, and how tips like this can save you significant time in the long run. Plus, when on a laptop with a squirrely touchpad, this can save you those few seconds of frustration.
For more productivity tips, subscribe to NuTech Services’s blog and check back every week.
