 Computer monitors have been getting bigger and brighter for years; improving on picture quality, responsiveness, and energy efficiency. However, working in a dark room in front of a bright screen can lead to eye strain and even headaches. You can avoid these side effects by lowering the brightness on your screen. Furthermore, lowering your screen’s brightness can save you precious battery life on your laptop, so it’s worth keeping these tips in mind for that fact alone.
Adjust Screen Brightness on Your Laptop
Turning down the screen brightness on your laptop is simple, however, the process might be a little different depending on the make and model of your device.
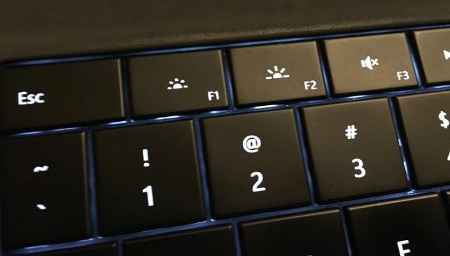
Check out the line of F keys at the top of your keyboard; do any of them have a little icon that looks like a light bulb, a sun, or any other light source? Once you’ve found them, the one with more light around it increases your brightness, while the one with less light around it decreases the brightness. You may need to find your Fn or Function key, and hold it down to trigger the brightness options as well.

If you don’t see the brightness keys, it’s possible your laptop doesn’t have them, or has buttons on the front or side that control the brightness.
Manually Adjust Screen Brightness in Windows 10
Keep in mind that the aforementioned tip only applies to laptops. Therefore, if you want to decrease the brightness of your desktop PC, there are a few ways to do this. For one, you can click on the battery icon in Windows 10’s notification area, which lets you adjust the brightness. If you want to use the Settings app to do the same thing, that’s also an option. All you have to do is open Settings from the Start menu, select System, and choose Display. Then, it’s just a matter of adjusting the slider to what you want the brightness to be.
You can also click the search icon on your and simply type “brightness settings“.
If you’re using Windows 7 or 8, you can adjust your screen’s brightness by going through the Control Panel. Select Hardware and Sound, and select Power Options. A Screen brightness slider will be available at the bottom of the Power Plans window.
Automatically Adjust Brightness When Your Battery’s Low
You can set your Windows 10 PC’s brightness to automatically adjust in relation to your remaining battery life. Open Settings > System > Battery save, and select Battery saver settings. Make sure that the Lower screen brightness while in battery saver is checked, and you can use the adjustable bar to choose the percentage at which the screen will dim. By default, it will be set at 20 percent battery remaining.
Bonus Tip: Don’t Forget Your Monitor Settings
Although in our opinion, it’s usually more difficult to navigate through the monitor settings with the buttons on the front or the side of your computer monitor, but in extreme cases, it doesn’t hurt to check them if your eyes are experiencing fatigue. Most monitors have several different settings, including brightness, contrast, and color adjustments that you can tweak to make it easier on the eyes. We wish we could give you some tips for this, but virtually every monitor and manufacturer have slightly different configurations.
By effectively managing your screen’s brightness, you can help keep your eyes focused and in less pain. Plus, your battery will last longer, which is a win-win situation for both your work and your device.
For more great tips and tricks, subscribe to NuTech Services’s blog.
